IoT and MQTT
MQTT
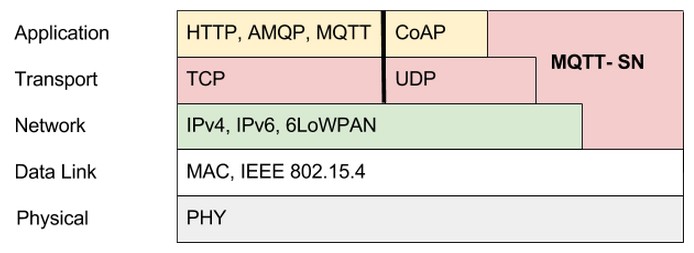
MQTT (MQ Telemetry Transport or Message Queuing Telemetry Transport) is an ISO standard (ISO/IEC PRF 20922) publish-subscribe-based messaging protocol. It works on top of the TCP/IP protocol. It is designed for connections with remote locations where a “small code footprint” is required or the network bandwidth is limited. The publish-subscribe messaging pattern requires a message broker.
Raspberry Pi can become a broker server or the broker server can be a service on cloud server. Please be noted that the broker can act as a client also at the same time.
MQTT Client: An MQTT client is any device that runs an MQTT library and connects to an MQTT broker over a network. Both publisher and subscriber are MQTT clients. The publisher and subscriber refer that whether the client is publishing messages or subscribing to messages.
MQTT Broker: The broker receives all messages, filter the messages, determine who is subscribed to each message, and send the message to these subscribed clients


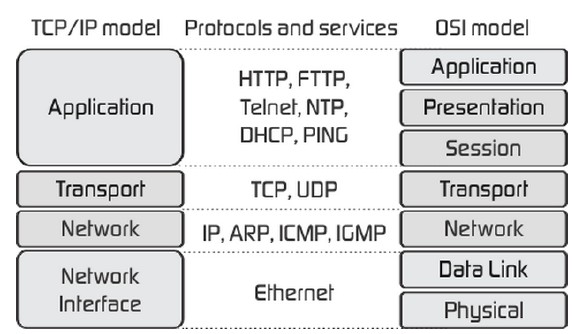
OSI layer and TCP/IP application
Raspberry Pi MQTT Server Install (credit: iotdesignpro.com)
To install Mosquitto server and client on your Pi, open Pi terminal and run this command:
sudo apt-get install -y mosquitto mosquitto-clients
After running this command, a Mosquitto server is started automatically.
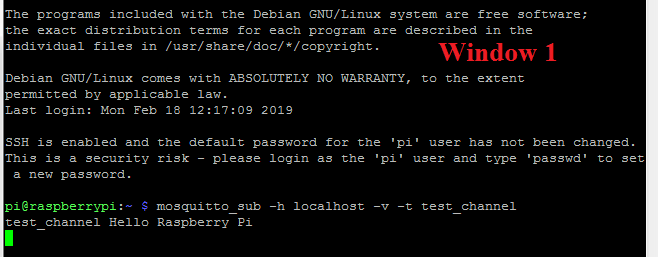
Now we will open a subscriber in the channel using “test_channel” that will receive messages from publisher:
mosquitto_sub -h localhost -v -t test_channel
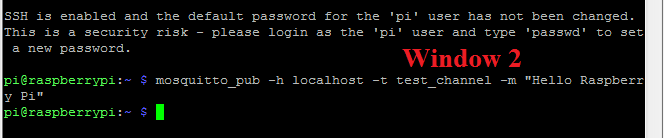
After subscriber we will open a publisher in the same channel with a message to subscriber:
mosquitto_pub -h localhost -t test_channel -m "Hello Raspberry Pi"
Example 1
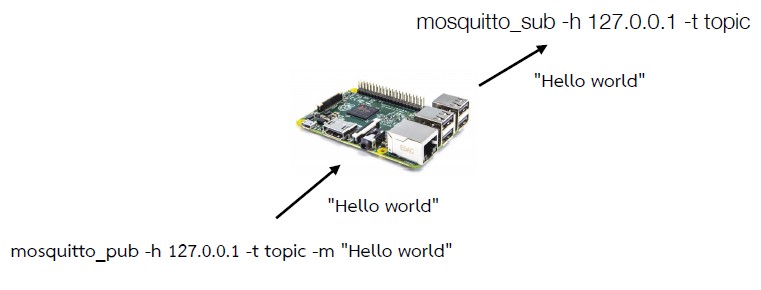
Testing the mosquitto protocol
1. Open one Raspberry Pi terminal and type the following command to subscribe to the topic’s name “topic” at your own IP, the IP address can be changed to be the IP of another broker
mosquitto_sub -h 127.0.0.1 -t topic
(Note: topic can be changed to your own topic)
2. Open another terminal and try to Publish by using the following command:
mosquitto_pub -h 127.0.0.1 -t topic -m “Hello world”
Note! : -h = host, -t = parameter of the topic and -m = message
Note: We are simply transferring data to the same Raspberry Pi. For that just open two putty terminals, one for the subscriber and other for the publisher. If you are using two different Raspberry Pi’s, then enter your second Pi’ IP address rather than localhost. For example:
mosquitto_pub -h 192.168.1.31 -t test_channel -m "Hello Raspberry Pi"
Example 2
Raspberry Pi – MQTT Data Exchanging Using Python
The second method to set up a connection between two Raspberry Pi’s using MQTT is using Python code.
In this method, we will use two different python codes for the subscriber and publisher in two different windows or two different Pi’s.
For this first install Paho MQTT library using this command:
sudo pip install paho-mqtt
Now in the first terminal window, create a subscriber file
sudo nano mqtt_subscriber.py
Copy this code and paste it to the subscriber file.
import paho.mqtt.client as mqtt
MQTT_SERVER = "localhost"
MQTT_TOPIC = "your_topic"

# The callback for when the client receives a connect response from the server.
def on_connect(client, userdata, flags, rc):
    print("Connected with result code "+str(rc))

    # on_connect() means that if we lose the connection and reconnect then subscriptions will be renewed.
    client.subscribe(MQTT_TOPIC)

# The callback for when a PUBLISH message is received from the server.
def on_message(client, userdata, msg):
    print(msg.topic+" "+str(msg.payload))
    # more callbacks, etc

client = mqtt.Client()
client.on_connect = on_connect
client.on_message = on_message
client.connect(MQTT_SERVER, 1883, 60)

# Blocking call that processes network traffic, dispatches callbacks and
# handles reconnecting.
# Other loop*() functions are available that give a threaded interface and a
# manual interface.
client.loop_forever()
Now run this code using:
sudo python mqtt_subscriber.py
Now our subscriber setup is complete. To set up publisher open a new putty window and create a publisher file using:
sudo nano mqtt_publisher.py
Copy the below code to publisher file.
import paho.mqtt.publish as publish
MQTT_SERVER = "localhost"
MQTT_PATH = "test_channel"
publish.single(MQTT_PATH, "Hello World!", hostname=MQTT_SERVER)
Note: If you are using two different Pi’s, then enter your second Pi’s IP address in place of ‘localhost’ in MQTT_ SERVER.
And run it using:
sudo python mqtt_publisher.py

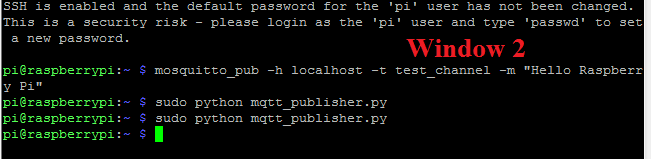
Hence, we have successfully send the data from Pi using MQTT Server.
Different MQTT servers/services

Example 3
Connect LED from the smart board to pins 22. Control LED based on the messages received from the clients.
Code for client
# MQTT Client demo
# Continuously monitor two different MQTT topics for data,
# check if the received data matches two predefined 'commands'

import paho.mqtt.client as mqtt
MQTT_SERVER = "localhost"
MQTT_TOPIC = "topic1"
MQTT_TOPIC2 = "topic2"


# The callback for when the client receives a CONNACK response from the server.
def on_connect(client, userdata, flags, rc):
    print("Connected with result code "+str(rc))

    # Subscribing in on_connect() - if we lose the connection and
    # reconnect then subscriptions will be renewed.
    client.subscribe("MQTT_TOPIC")
    client.subscribe("MQTT_TOPIC2")

# The callback for when a PUBLISH message is received from the server.
def on_message(client, userdata, msg):
    print(msg.topic+" "+str(msg.payload))

    if msg.payload == "ON":
        print("Received message #1, do something")
    GPIO.output(22, 1) # turn on LED

    elif msg.payload == "OFF":
        print("Received message #2, do something else")
        # Do something else
    GPIO.output(22, 0) # turn off LED

# Create an MQTT client and attach our routines to it.
client = mqtt.Client()
client.on_connect = on_connect
client.on_message = on_message

client.connect("MQTT_SERVER", 1883, 60)

# Process network traffic and dispatch callbacks. This will also handle
# reconnecting. Check the documentation at
# https://github.com/eclipse/paho.mqtt.python
# for information on how to use other loop*() functions
client.loop_forever()
To Control the LED, open another terminal to publish the IoT message:
mosquitto_pub -h 192.168.1.31 -t topic1 -m “ON”
mosquitto_pub -h 192.168.1.31 -t topic2 -m “OFF”
Assignment 5.A
Connect also LED 2 and LED 1 to pins 26 and 24 respectively. Modify the previous assignment to control LEDs (on and off) based on IoT messages from two topics. Topic1 control LED 1 and Topic 2 control LED 2.